Autoinstall Ubuntu servers with a CD
Although it’s been a few years since I switched from full-time Sysadmin to full-time Coder, being in a startup means getting saddled with an opsy task now and again regardless of your “title”.
The problem: We bought a bunch of servers which need minimal OS, IP and a hostname before they’re racked. In otherwords, we want to drop them in a datacenter, turn them on, and leave knowing there’s remote SSH access. Data centers are environmentally hostile (hot rows, cold rows, too loud). It’s ideal to get in and out as quickly as possible and do any remaining config while listening to music and having a cup of tea.
The solution: An automated Ubuntu install using preseeding. One goal is to get a solution setup as quickly as possible. We don’t have 100s or 1000s of servers that need install, but we don’t want to setup temporary network infrastructure, and we don’t want all the developers (there’s not many) sitting around hitting <enter> every few minutes. In my past life I may have gone for netbooting and a DHCP server handing out the IPs and hostnames, but this life lead to the shorter road of burning an Ubuntu Server disc with a preseed file.
Configuring the disc image
Open an existing Ubuntu Server image and copy it’s contents somewhere. I used rsync -a to copy the image volume to my drive. This directory is the contents of the new disc image. All that’s needed is a preseed file and modifying the boot config to load it.
Creating a seed file
Start with the example Maverick preseed file. The comments are good so you can get most of the way just going through it. However, I ended up in a short trial and error process to get it fully baked.
Gotcha 1: LVM partitioning
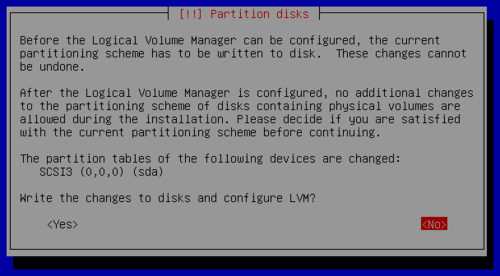
During LVM partitioning, the install got stuck while waiting for confirmation on “Write the changes to disk and configure LVM?”:

Set this undocumented (AFAICT) option:
d-i partman-lvm/confirm_nooverwrite boolean true
Gotcha 2: Apt security update from the network
Althought this doesn’t stop the install, it takes a while for Apt to give up trying to contact the host. To keep things speedy, disable it by setting a null security repo host:
d-i apt-setup/security_host string
Bonus: Setup the apt/sources.list
With all the Apt repositories disabled, no useful lines are added to /etc/apt/sources.list. This doesn’t matter too much if next you’ll be running an install script on the box (fix the sources.list in the script), but if not, it’s an annoying yak you’ll shave when you want to upgrade or install a package. Regardless, it’s so easy to make it right, you might as well:
d-i preseed/late_command string echo 'deb http://us.archive.ubuntu.com/ubuntu/ maverick main restricted universe multiverse' >> /target/etc/apt/sources.list; echo 'deb http://us.archive.ubuntu.com/ubuntu/ maverick-updates main restricted universe multiverse' >> /target/etc/apt/sources.list; echo 'deb http://security.ubuntu.com/ubuntu maverick-security main restricted universe multiverse' >> /target/etc/apt/sources.list
Your preseed config is done so save it to preseed/local.seed (or whatever/wherever) in the directory you made.
Modifying the boot config
To make the CD use your seed on boot, modify isolinux/isolinux.cfg to timeout quick and use the file you saved. Mine looks like this:
# D-I config version 2.0
include menu.cfg
default autoinstall
prompt 0
timeout 1
ui gfxboot bootlogo

LABEL autoinstall
  menu label ^Minimal autoinstall
  kernel /install/vmlinuz
  append preseed/file=/cdrom/preseed/local.seed debian-installer/locale=en_US console-setup/layoutcode=us localechooser/translation/warn-light=true localechooser/translation/warn-severe=true initrd=/install/initrd.gz ramdisk_size=16384 root=/dev/ram rw quiet --
Creating the disc image
To make a bootable ISO you’ll need mkisofs. If you’re on Mac OS X (like me) you can use MacPorts — sudo port install cdrtools — or the hipster package manager1, Homebrew. Once you have the tool you need, just follow this command-line:
mkisofs -r -V 'Ubuntu Autoinstaller' -cache-inodes -J -l \
    -b isolinux/isolinux.bin -c isolinux/boot.cat \
    -no-emul-boot -boot-load-size 4 -boot-info-table \
    -o custom_ubuntu_autoinstaller.iso /path/to/your/files
And … your done. Use Virtualbox to test the boot image and tweak the preseed file to make it do what you want. Don’t forget to re-run the mkisofs command whenver you change the seed or isolinux.cfg files!
-
Just kidding. I’m a fan of mxcl’s projects. Got Audioscrobbler.app running right now! ↩︎